How to Apply Gel Nail Polish: Step-by-Step Guide at Home
Charlotte WhiteEver wondered how nail techs get that impossibly perfect, lasts-for-weeks gel manicure? It’s not magic, and it’s not just the polish. It’s all about the process. The secret to that salon-worthy finish is meticulous prep and applying impossibly thin layers.
We’re breaking it down into four key stages: nail prep, base coat, colour coats, and that all-important top coat. Get these right, and you'll be curing each layer under your lamp like a total pro.
The Secret to a Salon-Worthy Manicure at Home
It's the ultimate nail dilemma: your at-home gel mani chips in a week, but the one from the salon looks flawless for what feels like forever. So, what gives? It all comes down to the technique. Gel polish has completely taken over for anyone craving durable, chip-free nails, and honestly, we get it.
The obsession is real, and the numbers back it up. In the UK, the nail polish market pulled in around USD 851.8 million in 2023, with UV gel polish being a huge piece of that pie. And it’s still growing! You can dig deeper into the stats on the UK nail polish market on Grandview Research if you're a numbers geek like us. The appeal is obvious: a finish that lasts up to three weeks without a single chip in sight.
Why Gel Polish Outlasts Traditional Varnish
So, what’s the actual difference? It’s all in the cure. Your classic nail varnish hardens as solvents evaporate, a slow process that leaves it prone to smudges for hours. Gel polish is a whole different ball game. It undergoes a chemical reaction called polymerisation when it hits the light from a UV or LED lamp.
This process instantly hardens the polish into a tough, plastic-like layer. It’s pure science, and it’s what gives gel its famous strength and incredible shine, making it so much better at handling daily life.
Consider this your insider guide to getting those pro results right from your living room. Once you nail the fundamentals, you'll be saving yourself time and money without ever sacrificing that perfect, glossy finish. Let’s get into the techniques that truly separate a good manicure from a great one.
Building Your Essential At-Home Gel Manicure Kit
Getting that perfect, long-lasting gel mani at home all starts with having the right kit. It’s so tempting to just grab an all-in-one starter set, but trust me, understanding what each tool actually does will save you from wasting money on things you just won't use. When you build your own kit, you're creating a professional-grade setup that's perfectly tailored to you.
The first big decision? Your curing lamp. This is the most important piece of hardware you'll buy, and your main choice is between a UV lamp and an LED lamp. LED is definitely the way to go for most of us doing our nails at home. They're much faster, curing each coat in about 30-60 seconds, while a UV lamp can take a good 2-3 minutes per coat. The time you save really adds up, making an LED lamp a totally worthwhile investment.
The Secrets to a Flawless Finish
Now, let's get into the products that will actually touch your nails. A high-quality base coat and a no-wipe top coat are absolutely non-negotiable. Think of the base coat as the essential anchor for your colour, and the top coat as the secret to that signature, super-durable, high-gloss shine we all crave.
Another total game-changer for making your manicure last is a bonder or primer. This little miracle worker dehydrates the nail plate just enough to create the perfect tacky surface for your base coat to grip onto. Seriously, this one extra step can be the difference between a mani that lasts weeks and one that starts lifting after a few days. If you're curious and want to dive deeper, you can learn more about why primer is the key to your mani right here.
Quick tip: The quality of your prep products directly impacts how your manicure turns out. Investing in a good system from the very beginning is the best way to guarantee that salon-worthy finish every single time.
Finally, you need the right tools for prepping your nails and cleaning up. Before we get to the fun part (the colour!), you need to have your toolkit ready.
Your Gel Manicure Toolkit Checklist
To get that pro-level finish, you need the right tools for the job. Some are must-haves, while others are nice extras. Here’s a quick breakdown to help you build your perfect kit.
| Tool/Product | Purpose | Essential/Optional |
|---|---|---|
| LED Curing Lamp | Cures the gel polish, making it hard and durable. | Essential |
| Base Coat | Creates a protective layer and helps the colour adhere. | Essential |
| No-Wipe Top Coat | Seals the colour with a high-gloss, chip-resistant finish. | Essential |
| Primer/Bonder | Dehydrates the nail plate to prevent lifting and chipping. | Essential for longevity |
| 180-Grit File & Buffer | Shapes the nail and gently removes shine for adhesion. | Essential |
| Cuticle Pusher | Pushes back cuticles for a clean application area. | Essential |
| Isopropyl Alcohol | Cleanses the nail plate of oils and dust before starting. | Essential |
| Lint-Free Wipes | Used with alcohol to clean nails without leaving fluff. | Essential |
| Cuticle Oil | Nourishes the cuticles and skin after the manicure. | Optional (but highly recommended!) |
Having these items on hand means you’re always ready for a flawless manicure without any last-minute scrambling. It’s all about setting yourself up for success
Mastering Nail Prep For Flawless Adhesion
 If there’s one stage where a home manicure goes spectacularly wrong, it’s the prep. Honestly, it’s everything. Think of your nail like a canvas; you wouldn't start painting on a dusty, oily surface and expect a masterpiece.
Proper prep is the absolute foundation for a durable, lift-free gel application that lasts for weeks, not just a few disappointing days.
Let’s start with creating a clean nail plate. This begins with your cuticles. Gently push them back using a wooden orange stick or a metal pusher. The goal here is to reveal your true nail plate, which gives you more surface area to work on and—crucially—prevents your polish from lifting right at the base.
And please, avoid the temptation to cut your cuticles! They’re there for a reason, acting as a natural barrier against bacteria. Cutting them can lead to nasty irritation or even infection. A gentle push back is all you need for a tidy, professional-looking base.
Shaping and Buffing For Maximum Grip
Once your cuticles are looking neat, it's time to shape your nails. Grab a 180-grit file and gently work on the free edge to get your desired look, whether that’s square, round, or a chic almond. Always file in one direction to avoid weakening the nail. That aggressive back-and-forth sawing motion is a total no-go—it causes peeling and splitting.
Next up is the most critical part for adhesion: buffing. Take a soft buffer block and lightly go over the entire nail surface. You’re not trying to be rough or thin the nail; you just want to remove the natural shine. This slightly textured surface gives the gel base coat something to really grip onto, creating a much stronger bond. To give your gel the best chance, make sure your nails are strong and hydrated to begin with. We love incorporating a dedicated nail cream into our routine to promote nail health long before we even think about polish.
Pro Tip: The difference between a manicure that lifts in three days and one that stays put for three weeks is often found in how well you buffed. Your nail surface should look matte and dull, with zero shiny spots left behind.
After all that shaping and buffing, you’ll have a bit of dust and debris hanging around. This brings us to the final, non-negotiable prep step.
The Final Cleanse Before Application
Take a lint-free wipe soaked in isopropyl alcohol (at least 90%) and give each nail a thorough cleanse. This little swipe does two massively important things:
- It gets rid of every last speck of filing dust.
- It dehydrates the nail plate, zapping any natural oils that would stop the gel from sticking properly.
Skipping this will almost certainly mean your gel polish peels off way too soon. With a perfectly prepped nail, you’ve set the stage for a flawless, long-lasting manicure. You're ready for the fun part
A Practical Guide to Gel Polish Application
With your nails prepped and ready, it's time for the fun part: the colour! Applying gel polish is a bit of an art, but the technique is surprisingly simple once you learn the one big secret: thin coats are everything. Honestly, thick, goopy layers are the number one reason for wrinkling, bubbling, and a mani that just refuses to cure properly.
Each layer—your base, your colour, and your top coat—has a really specific job to do. Think of them as a team working together to give you that super durable, high-shine finish you're after. Getting each step right is what separates an okay home manicure from a truly great one.
The Three Pillars of Application: Base, Colour, and Top
First up is your base coat. You want to apply one incredibly thin, even layer, and be careful to avoid flooding your cuticles. If you do get a little bit on your skin (it happens to all of us!), just use a clean-up brush dipped in acetone to wipe it away before you cure. Trust me, skipping this is a classic rookie mistake that leads to lifting later on.
Next, it's time for a pro move that properly seals the deal: capping the free edge. All this means is gently swiping the brush along the very tip of your nail. This creates a seal that is your best defence against chips and helps your manicure last for weeks.
A question we get all the time is how many layers you actually need for that perfect, opaque look. While two coats of colour is usually the sweet spot, it really depends on the polish itself. If you're not sure, our guide on how many coats of gel polish is too many has some fab insights.
Once your base coat is on and the edge is capped, cure it under your LED lamp. This usually takes between 30-60 seconds.
Now for the colour! Apply your first layer, again, keeping it super thin. Don't forget to cap the free edge before curing for a full 60 seconds. Repeat the process with a second thin coat of colour, cap it, and cure again. Don’t panic if the surface feels a bit sticky after curing; this is just the inhibition layer, and it’s completely normal. It’s what helps the next layer stick!
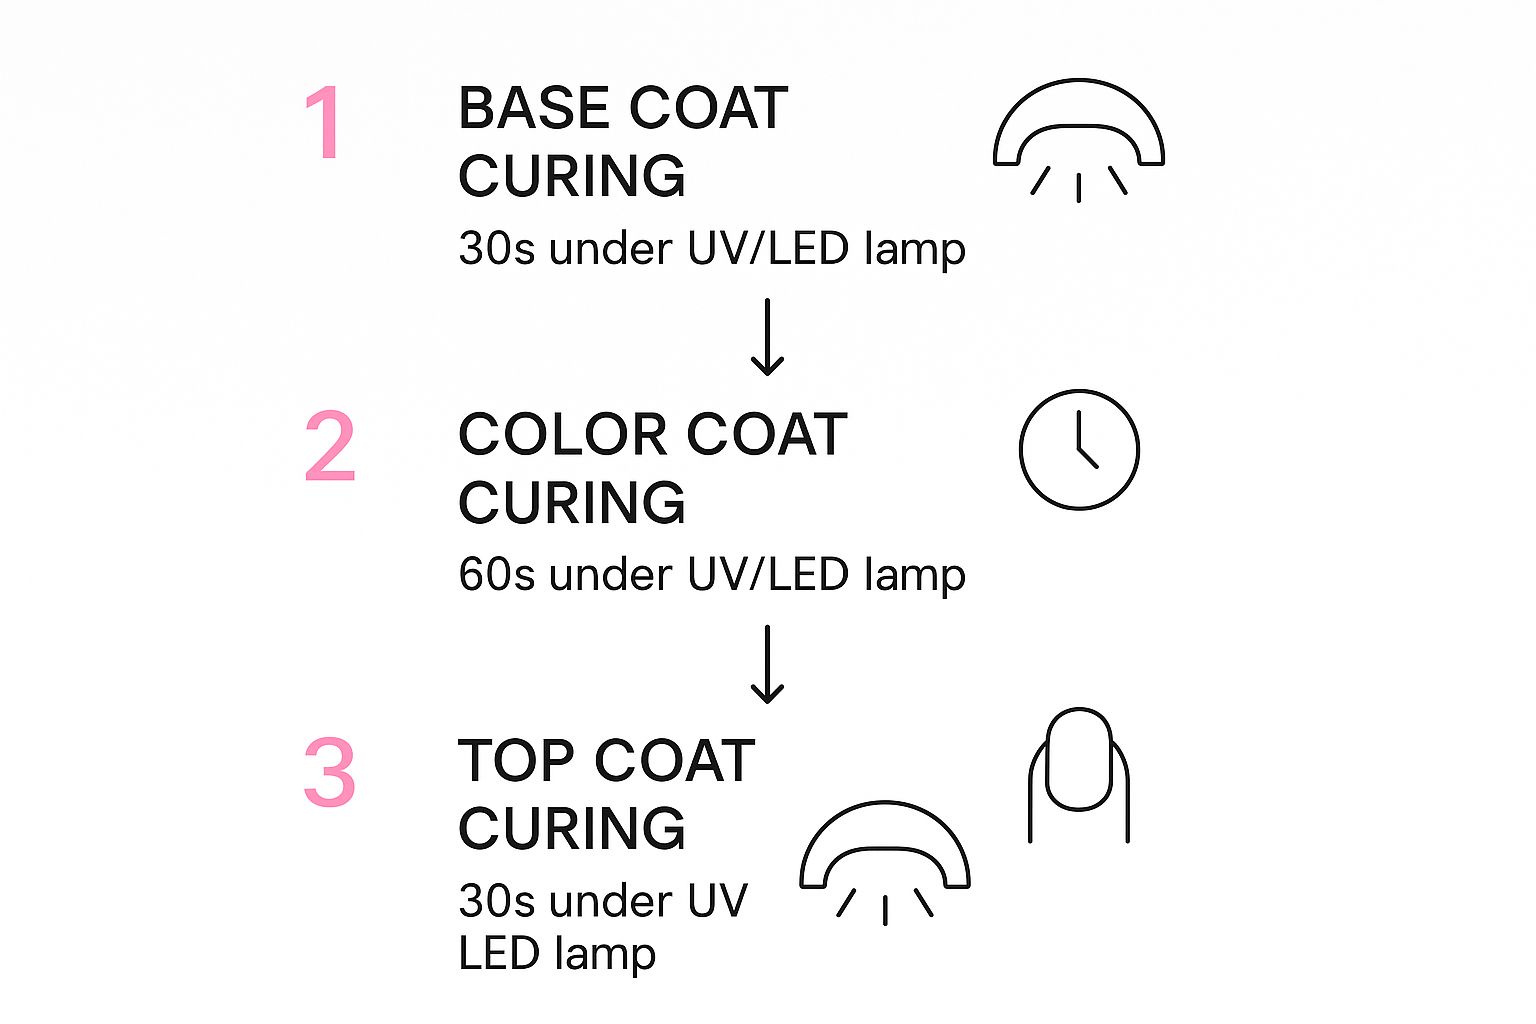
Finally, let's get that shine. Apply your no-wipe top coat. This is what gives your nails that signature glossy finish and rock-hard protection. Pop on a thin layer, cap the free edge one last time, and cure for 30-60 seconds.
And that’s it! You're left with a perfectly smooth, hard, and dazzlingly shiny manicure that looks like you've just stepped out of the salon.
Troubleshooting Common Gel Manicure Mistakes
Even with the most perfect prep and a super steady hand, things can sometimes go a little bit wrong. But don't you worry, most of the common gel mani mishaps are incredibly easy to fix and even easier to avoid next time around.
Honestly, knowing how to troubleshoot these little hiccups is what separates a good home manicure from a great one.
A question we get all the time is about that sticky feeling after the final cure. If you’re using a traditional top coat, that’s just the inhibition layer, and it’s totally normal! A quick, firm wipe with a lint-free pad soaked in isopropyl alcohol will get rid of it instantly, revealing that hard, super-glossy finish you've been working for.
Diagnosing Wrinkles and Bubbles
Ever finish your mani, only to spot tiny wrinkles or bubbles in the colour? It's the worst! This is almost always a sign that your polish was applied too thickly.
When a layer is too chunky, the top surface hardens under the lamp, but the polish underneath stays soft and uncured. This causes it to shrink up and wrinkle.
The absolute golden rule for applying gel polish is thin to win. Trust us, applying multiple, paper-thin coats is so much better than one or two thick ones. This makes sure every single layer cures properly for a smooth, flawless finish.
Another major frustration is when your gorgeous polish starts lifting or peeling at the edges after just a few days. This can usually be traced back to a few culprits:
- Skipped Capping: Forgetting to run your brush along the free edge of the nail leaves it open to chips.
- Lazy Prep: Any leftover oil or dust on the nail will stop the gel from sticking properly.
- Flooded Cuticles: If the polish cures on your skin, it's guaranteed to lift, and it'll take the rest of your nail colour with it.
Most lifting and chipping issues come straight back to the prep and application stages. Getting to grips with these common mistakes is a real game-changer. For a deeper dive, you can learn all about the reasons why your mani is chipping and become a true home-mani pro.
Think of every mistake as a lesson that gets you one step closer to your next perfect manicure
Removing Gel Polish Without Damaging Your Nails
How you take your gel polish off is just as crucial as how you put it on. Honestly, this is the moment where your nail health is either protected or completely compromised. Forget those damaging shortcuts like peeling or prying—they’re a fast track to weak, peeling nails that none of us want. The safest method is one that nail pros have trusted for years, and it's super easy to master at home.
The love for gel manicures has absolutely exploded, which means more people need to know the right way to take them off. In the UK alone, the number of nail gel users grew from 3.25 million in 2017 to 3.83 million by 2020, while traditional varnish use actually declined. You can see more on these nail polish usage trends on news.market.us.
The Safe Soak-Off Method
The absolute gold standard for at-home removal is the foil-wrap acetone method. It’s gentle, it’s effective, and it keeps your natural nails in top condition for your next mani.
First things first, gently file the shiny surface of your manicure with a 180-grit file. You only need to break the seal of the top coat, not file all the way down to your natural nail. This step is essential because it allows the acetone to get in and work its magic.
Next, grab some cotton wool and soak a small piece in 100% pure acetone. Pop the soaked cotton directly onto your nail, then wrap your fingertip up tightly in a little square of aluminium foil. This traps heat and stops the acetone from evaporating, letting it do its thing properly.
Wait patiently for about 10-15 minutes. When you unwrap your finger, the gel polish should look crinkled and be lifting away from the nail plate. Use a wooden orange stick to gently scrape away the loosened gel. If it doesn’t come off with minimal pressure, re-wrap it for another five minutes. Never, ever force it.
Post-Removal Nail Care
Once all the gel is off, your nails will be thirsty. This is the perfect time for some serious TLC.
Give your hands a good wash, and then generously apply a high-quality cuticle oil to your nails and the skin around them, massaging it in. To keep them in prime condition for whatever look you’re planning next, check out our guide on how to care for your gel manicure for more of our expert tips.
Your At-Home Gel Mani Questions, Answered
Jumping into the world of at-home gel manicures is exciting, but it’s totally normal to have a few questions bubble up. Getting to grips with the little details and troubleshooting the odd hiccup is what builds your confidence for that flawless, salon-worthy finish every single time.
Let's get into some of the questions we hear all the time.
Why Is My Gel Polish Wrinkling?
Ah, the dreaded wrinkling. This is almost always down to one thing: applying your colour coats too thickly. It’s so tempting to load up the brush for a quick, opaque finish, but gel polish needs super thin, even layers to cure properly under the lamp.
When a layer is too thick, the top surface hardens, but the polish underneath stays soft and gooey. This is what causes that crinkled, peeling mess. Think thin, thin, thin!
Can I Use Regular Polish With a Gel Top Coat?
Honestly? No, it’s not a good idea. Regular nail polish is designed to air-dry by evaporation, whereas gel polish needs UV or LED light to harden (or ‘cure’).
If you try to trap wet, regular polish under a sealed gel top coat, you’ll end up with a smudged, soft manicure that just never fully sets. It can even lead to nail damage down the line.
For a manicure you can rely on to last, it's always best to stick with a full gel system, from your base coat right through to the top coat. Mixing and matching different systems can really mess up the whole result.
Is a Base Coat Really Necessary?
Absolutely, 100%. A gel base coat is non-negotiable for two huge reasons. First, it acts like double-sided tape, creating a powerful bond between your natural nail and the colour. This is your secret weapon against lifting and chipping.
Second, it acts as a protective barrier for your natural nail, preventing those highly pigmented gel colours from causing any staining. Don't skip it!
How Long Should I Cure Each Coat?
This is a great question, as curing times can change depending on your lamp and the specific polish brand you’re using. But as a general guide:
- LED lamps usually need 30-60 seconds for each coat.
- Older UV lamps might take a bit longer, sometimes up to 2 minutes.
Your best bet is to always check the instructions on your gel polish bottle and your lamp. Getting the timing right is crucial for that rock-solid, long-lasting finish we all want.
Ready to build your own colourful, collectible manicure experience? Explore the full range of vibrant gel polishes and nail essentials at Candy Coat and start building your dream collection today.
Article created using Outrank